

Showing posts with label Crafts. Show all posts
Showing posts with label Crafts. Show all posts
Tuesday, December 2, 2014
Wednesday, November 26, 2014
Friday, February 14, 2014
Valentine's Day Keeping Up With The Jones(es)
 |
| Show your love with homemade baked goods! |
I wish everyone a Happy Valentine's Day but then again, I wish all your days to be happy.
Today is not special to me, by any means. I don't buy into the commercialized hype of this holiday. I think that your love and adoration should be celebrated every day of the year, not just on this day. If you cherish your love everyday then you don't need society to designate a day to shower your significant other with love, gifts and attention!
 |
| Musical Valentines By ZombieSmile http://zombiesmile.deviantart.com/ |
I believe that when guys over the top to create the perfect Valentine's Day that it's not really about love. I think that there is usually some other motivating factor behind the gesture, most likely guilt. They don't do it because they feel especially romantic today or because it's going to be fun for them mostly they buy the gifts, plan the date, get the flowers because society tells them they have to or their woman will be outraged. I hate being pressured into doing anything, how about you?
Monday, February 3, 2014
Seahawks Stomp Cake (Superbowl Sunday)
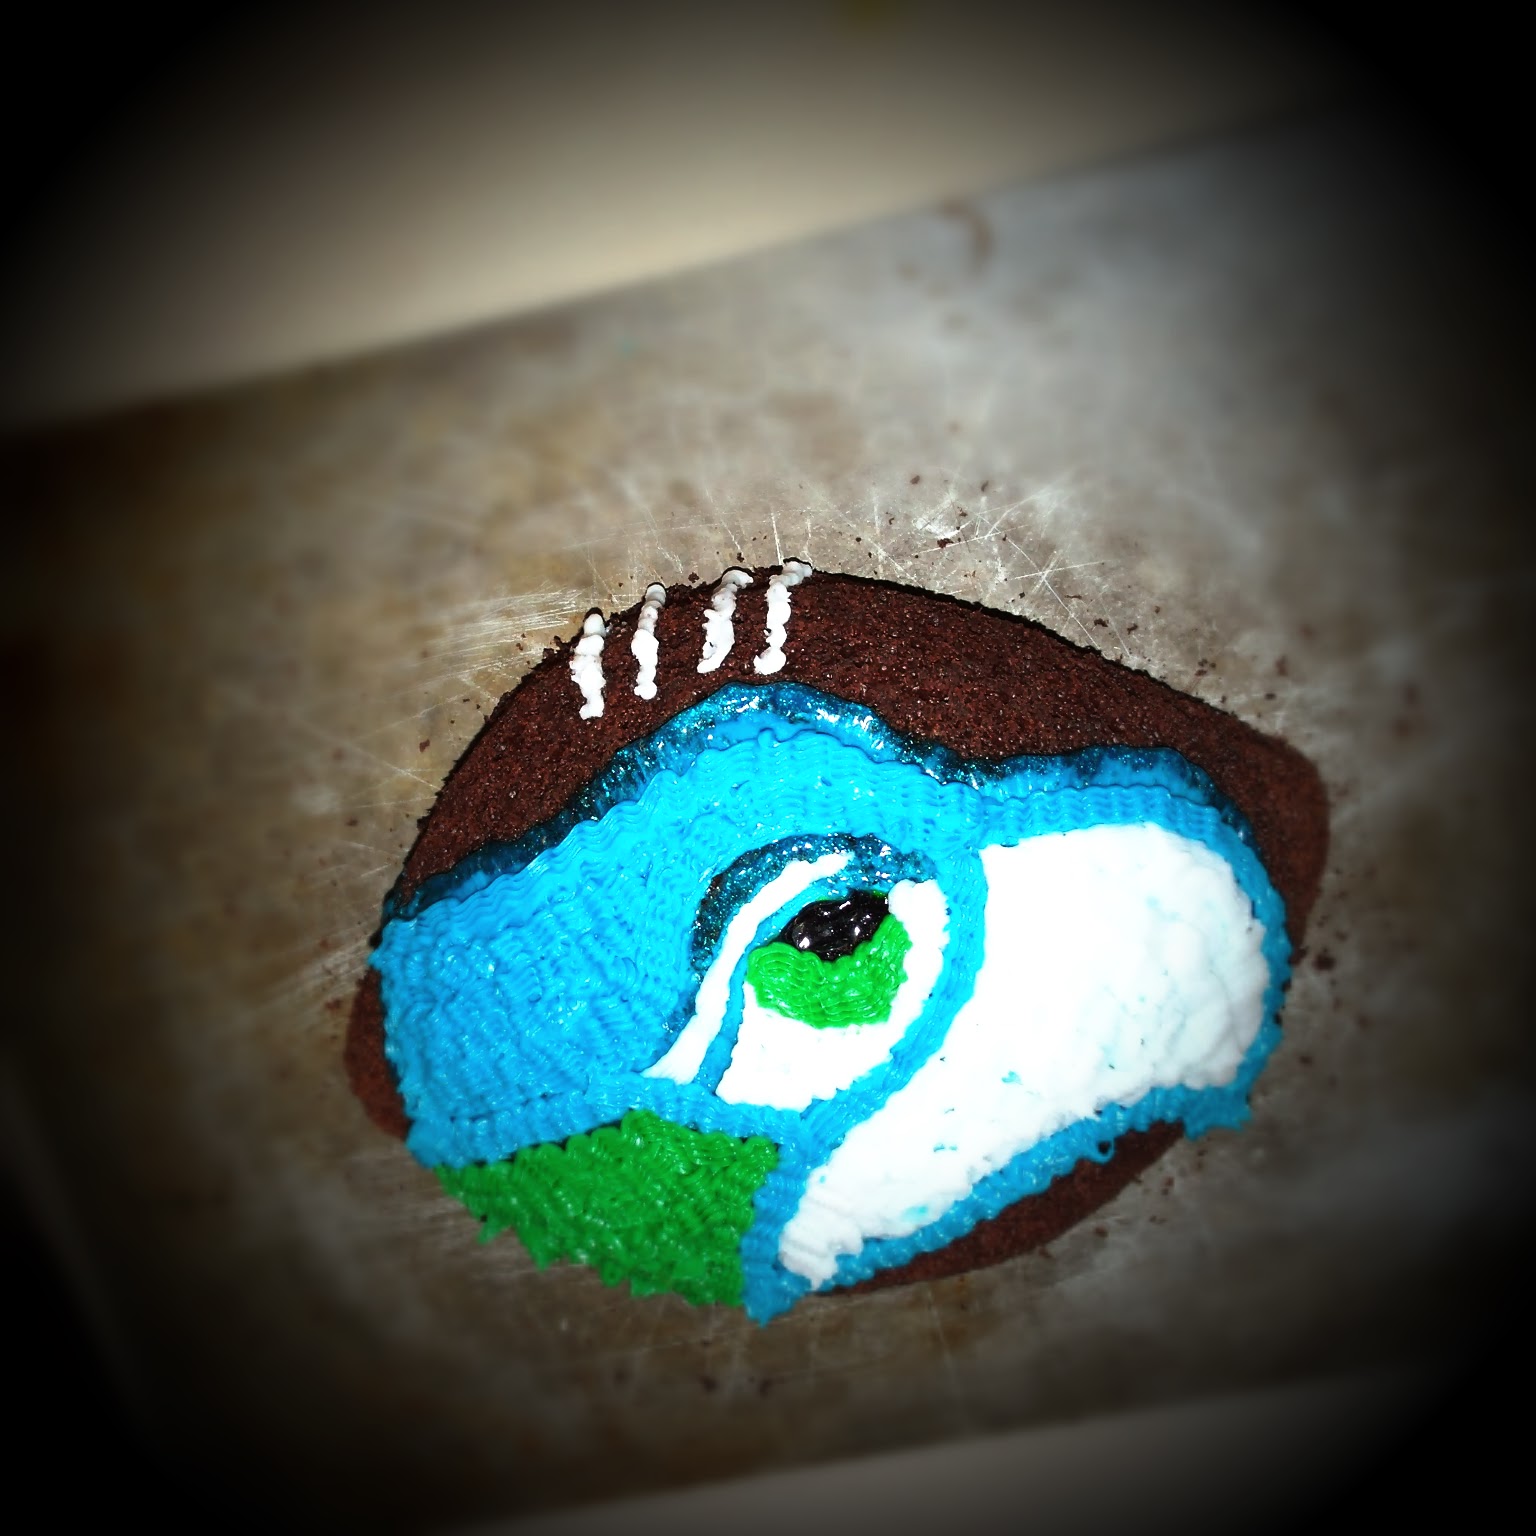
How I made this cake:
I used devil's food cake mix. I applied "Cake Release" to the inside of my Pyrex bowl (which makes the cake slide right out of the pan; doesn't matter if its plastic, meal or glass) prior to adding the batter and baked it until a toothpick came out clean. I then placed the bowl on a wire rack to allow it cool, then flipped the cake over onto a cookie sheet to remove it from the bowl. I used a long, thin, forever sharp knife to carefully cut what would become the bottom of the cake so it would sit flat, if you skip this step and the cake sits unevenly it may tear while carving or icing it! I then flipped it over back onto the cookie sheet and froze it for a couple of hours, I carved the football shape but it took a while as the cake would get too warm and I would have to put it back in the freezer to firm it up and then continue where i left off. Lastly I iced it, the Seahawk could have been better but it was done freehand and I was tired... But I did use a little glitter icing! :)
After the Hawks won the championship, I didn't have the heart to cut into this beauty... :) Good thing I brought a "second string" cake and made a last minute substitution!!! Otherwise I may have mauled by the kids wanting cake! Not sure how long I will hang onto this cake but for now it's in the freezer. I am thinking maybe I will save it for the next Seahawks Superbowl game!


Thursday, January 16, 2014
Paper Roses - Technique #1
 Creating Paper Roses - Technique #1
(Using Patterned Petals and securing with Elmer's Glue)
I have been looking into all the various ways to create flowers, specifically roses,out of paper.
 There are so many ways that it's overwhelming! So I am posting a few different sets of instructions with different techniques, tools and results.
 Step 1: Gather Supplies and Tools
Step 2: Draw Various Parts on Paper
Step 3: Cut Petals and Leaves for your Rose
Step 4: Fold and Burnish Outer Petals
Step 5: Glue Outer Petals Together.
Step 6: Proceed to Inner Petals
Step 7: Glue Inner Petals to Outer Petal Base
Step 8: Add Leaves
Step 9: Arrange Rose, or Roses as Desired


The above technique for creating paper roses was adapted from an Instructable and all photo credit goes to the Instructable (Unless otherwise notated in photo caption):
http://www.instructables.com/id/How-To-Make-Paper-Roses/?ALLSTEPS

Supplies and tools for this craft are very minimal.
Paper
Scissors
Glue
Pen, pencil or marker
Clamps (if available)
Paper can be construction paper, copy paper, old book pages, gift backs, gift wrap, scrapbook pages, newspaper,English: This is a paper bag from Victory Supermarkets (Photo credit: Wikipedia) brown paper bags…. Etc. Tissue paper is not recommended.


After some practice you can skip outlining the pieces and just cut them out.
Shown are some designs you can use to begin with. As you can see, each individual shape is quite simple. Draw if necessary by following the picture shown. Try to maintain size relationships.

To make one rose you should have cut out a few leaves (2 or 3) and 7 petals (3 outer pedals and 4 inner petals)


The three outer petals are glued together to make the base of the rose.


Here, three or four concentric circles are wound or wrapped into cone shapes. You should have 3 or 4 different sizes of circles.

Having glued three or four cones together, we can now glue them to the base.

I add two or three leaves to the bottom of the rose. The leaves are cut out and the edges are serrated by making cuts along the edges of the leaf.
Wednesday, August 14, 2013
Random Project: How TO Create Awesome Duct Tape art!
 I adore duct tape, I have loved it since I discovered it's ability to stick to almost anything when I was in middle school. That’s when it became my go-to preferred tape for anything except paper! I used duct tape to repair a belt once and then decided I would wrap the whole belt with the tape. It looked awesome, so I thought what else could I do with this?
I used it for all kinds of different things, covering notebooks, decorating my backpack and so many other things! But, it wasn't until about two years ago that I started using different colors and patterns of duct tape to create 2 dimensional art.
Subscribe to:
Posts (Atom)